It is very apparent that everyone has their own interpretation of the terms 'mono' and 'stereo', influenced by their own experiences and expectations. Translating one's experience with home audio systems or project studios into a large venue like a church or a theatre often takes an adjustment in conceptual thinking, so we always have to provide a reference point for the discussion of mono, stereo and two channel sound systems. Let's start off with mono.
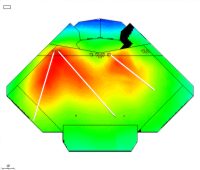
MouseOver - Single channel versus two channel loudspeaker coverage
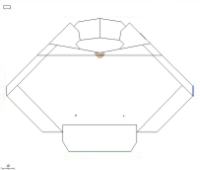
Compare the single channel centre
cluster coverage to the following:
1. Single centre cluster
2. Both left & right speakers
3. Left channel speakers only
4. Left channel with left "stinger"
5. Left channel with right "stinger"
6. Both channels with "stingers"
Mono
 Mono or monophonic describes a system where all the audio signals are mixed together and routed through a single audio channel. Mono systems can have multiple loudspeakers, and even multiple widely separated loudspeakers. The key is that the signal contains no level and arrival time/phase information that would replicate or simulate directional cues. Common types of mono systems include single channel centre clusters, mono split cluster systems, and distributed loudspeaker systems with and without architectural delays. Mono systems can still be full-bandwidth and full-fidelity and are able to reinforce both voice and music effectively. The big advantage to mono is that everyone hears the very same signal, and, in properly designed systems, all listeners would hear the system at essentially the same sound level. This makes well-designed mono systems very well suited for speech reinforcement as they can provide excellent speech intelligibility.
Stereo
True stereophonic sound systems have two independent audio signal channels, and the signals that are reproduced have a specific level and phase relationship to each other so that when played back through a suitable reproduction system, there will be an apparent image of the original sound source. Stereo would be a requirement if there is a need to replicate the aural perspective and localization of instruments on a stage or platform, a very common requirement in performing arts centres.
This also means that a mono signal that is panned somewhere between the two channels does not have the requisite phase information to be a true stereophonic signal, although there can be a level difference between the two channels that simulates a position difference, this is a simulation only. That's a discussion that could warrant a couple of web pages all by itself.
An additional requirement of the stereo playback system is that the entire listening area must have equal coverage of both the left and right channels, at essentially equal levels. This is why your home stereo system has a "sweet spot" between the two loudspeakers, where the level differences and arrival time differences are small enough that the stereo image and localization are both maintained. This sweet spot is limited to a fairly small area between the two loudspeakers and when a listener is outside that area, the image collapses and only one or the other channel is heard. Living with this sweet spot in your living room may be OK, since you can put your couch there, but in a larger venue, like a church sanctuary or theatre auditorium, that sweet spot might only include 1/3 the audience, leaving 2/3 of the audience wondering why they only hear half the program.
In addition a stereo playback system must have the correct absolute phase response input to output for both channels. This means that a signal with a positive pressure waveform at the input to the system must have the same positive pressure waveform at the output of the system. So a drum, for instance, when struck produces a positive pressure waveform at the microphone and should produce a positive pressure waveform in the listening room. If you don't believe that this makes a tremendous difference, try reversing the polarity of both your hifi loudspeakers some day and listening to a source that has a strong centre sound image like a solo voice. When the absolute polarity is flipped the wrong way, you won't find a stable centre channel image, it will wander around away from the centre, localizing out at both the loudspeakers.
Two Channel
 This is what many people mistake for stereo sound systems, because there are two channels and a "stereo" console is connected to the front of the system, and stereo amplifiers and equalizers are used throughout the system. What is missing from most of these systems is uniform coverage of the entire listening area, and a minimal level and phase response difference for each channel's coverage of the listening area. To achieve proper loudspeaker coverage to replicate a stereo image in a large venue, it is necessary to have a loudspeaker system for each channel that can provide uniform coverage of the entire listening area while maintaining the directional cues. This is a very expensive, and sometimes impossible proposition.
 Two channel systems usually suffer from having half the people in the listening area only hear half the audio program, which makes two channel systems a poor choice for music reinforcement. A large portion of the listeners hear a completely different music mix from other listeners. This is an all-too-common oversight in venues that are intended for music and entertainment, even high profile venues where they deserve better system designs. It tends to be a common misconception brought forward by people with a background in portable or live sound systems.
When a two channel system is used to reinforce a mono voice microphone, the seats either side of the room centreline, exactly between the two loudspeakers, also experience substantial variations in frequency response and uniformity of coverage due to interference and signal cancellation when identical signals arrive from the two channels at different times. This makes two channel systems especially ineffectual for speech reinforcement applications.
This is what many people mistake for stereo sound systems, because there are two channels and a "stereo" console is connected to the front of the system, and stereo amplifiers and equalizers are used throughout the system. What is missing from most of these systems is uniform coverage of the entire listening area, and a minimal level and phase response difference for each channel's coverage of the listening area. To achieve proper loudspeaker coverage to replicate a stereo image in a large venue, it is necessary to have a loudspeaker system for each channel that can provide uniform coverage of the entire listening area while maintaining the directional cues. This is a very expensive, and sometimes impossible proposition.Two channel systems usually suffer from having half the people in the listening area only hear half the audio program, which makes two channel systems a poor choice for music reinforcement. A large portion of the listeners hear a completely different music mix from other listeners. This is an all-too-common oversight in venues that are intended for music and entertainment, even high profile venues where they deserve better system designs. It tends to be a common misconception brought forward by people with a background in portable or live sound systems.When a two channel system is used to reinforce a mono voice microphone, the seats either side of the room centreline, exactly between the two loudspeakers, also experience substantial variations in frequency response and uniformity of coverage due to interference and signal cancellation when identical signals arrive from the two channels at different times. This makes two channel systems especially ineffectual for speech reinforcement applications.
Left/Centre/Right
There are specialized applications for sound systems described as Left/Centre/Right configurations. This must combine the best of both worlds, right? Well it can, but the loudspeaker system must also be designed to the highest common denominator not the lowest. It is also important with an LCR system that the mix engineer understand which signals must be routed to which loudspeakers, and which signal routings will create problems. LCR systems also are not suitable for use in all room shapes and configurations.
LCR systems are common in drama theatres and large churches where there is a requirement for both mono speech reinforcement and music or sound effects cues to be localized or mixed with a particular perspective, with a stereo or stereo-like imaging. The three loudspeaker systems must each provide coverage of the entire seating area while maintaining level and directional cues, just like the mono and stereo systems described above. There are some clever "cheats" a system designer can use to achieve the extended listening area for stereo coverage, and that invloves using "stingers" or infill loudspeakers.
Stingers
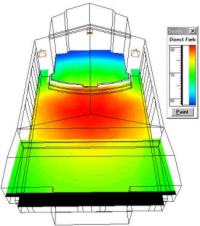
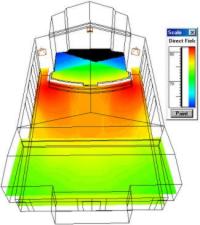
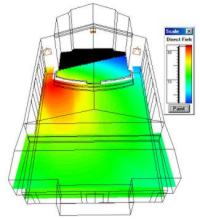
As shown above in the MouseOver demo, a stinger is a speaker positioned to provide coverage of a floor area that may be inaccessible from the left or right cluster mounting position.
 In the example above, the left and right stingers are separate from the centre cluster, and would be fed from a signal delay so that for people in the right side of the room, the signal from the left stinger would arrive at the same time as the sound from the left cluster would have if it could have reached that location. For people sitting near the front right, they would still hear the program from the left channel to maintain the integrity of the program content, even though the stereo image would be skewed to one side compared to the image perceived by the people sitting in the middle of the room. The speaker selection, as well as the level and delay setting of the stingers are all quite critical to their successful integration, if they are too loud, too late or too early they will detract from the image the rest of the audience hears. If you're going to try this at home study up on Haas Effect, setting levels and delays for precedence, as well as time domain measurement systems.
It is also possible to use some of the components of the centre cluster as the stingers, especially with the advent of lower cost DSP systems that allow a matrix of signal delays to be developed for each input to the unit. Even a few years ago this would have been exceedingly expensive and complicated (and nearly impossible to explain), now it can be programmed quickly on a computer screen and be made to work quickly and easily. This approach works best when the centre cluster has similar sounding loudspeaker components to the left/right clusters.
As shown above in the MouseOver demo, a stinger is a speaker positioned to provide coverage of a floor area that may be inaccessible from the left or right cluster mounting position.
In the example above, the left and right stingers are separate from the centre cluster, and would be fed from a signal delay so that for people in the right side of the room, the signal from the left stinger would arrive at the same time as the sound from the left cluster would have if it could have reached that location. For people sitting near the front right, they would still hear the program from the left channel to maintain the integrity of the program content, even though the stereo image would be skewed to one side compared to the image perceived by the people sitting in the middle of the room. The speaker selection, as well as the level and delay setting of the stingers are all quite critical to their successful integration, if they are too loud, too late or too early they will detract from the image the rest of the audience hears. If you're going to try this at home study up on Haas Effect, setting levels and delays for precedence, as well as time domain measurement systems.It is also possible to use some of the components of the centre cluster as the stingers, especially with the advent of lower cost DSP systems that allow a matrix of signal delays to be developed for each input to the unit. Even a few years ago this would have been exceedingly expensive and complicated (and nearly impossible to explain), now it can be programmed quickly on a computer screen and be made to work quickly and easily. This approach works best when the centre cluster has similar sounding loudspeaker components to the left/right clusters.
Which one's the best?
As with many questions about sound systems, there is no one right answer. A well designed mono system will satisfy more people than a poorly designed or implemented two channel sound system. The important thing to keep in mind is that the best loudspeaker design for any facility is the one that will work effectively within the, programmatic, architectural and acoustical constraints of the room, and that means (to paraphrase the Rolling Stones) "You can't always get the system that you want, but you find some times that you get the system that you need." If the facility design (or budget) won't support an effective stereo playback or reinforcement system, then it is important that the sound system be designed to be as effective as possible, even if that means giving up a desirable program requirement like stereo.
As with many questions about sound systems, there is no one right answer. A well designed mono system will satisfy more people than a poorly designed or implemented two channel sound system. The important thing to keep in mind is that the best loudspeaker design for any facility is the one that will work effectively within the, programmatic, architectural and acoustical constraints of the room, and that means (to paraphrase the Rolling Stones) "You can't always get the system that you want, but you find some times that you get the system that you need." If the facility design (or budget) won't support an effective stereo playback or reinforcement system, then it is important that the sound system be designed to be as effective as possible, even if that means giving up a desirable program requirement like stereo.


